Software Testing is evaluation of the software against requirements gathered from users and system specifications. Testing is conducted at the phase level in software development life cycle.
August 26, 2020
Assertions in Jmeter
Assertions in very simple words is check on response.
we test the format of response and time took to the response . All these checks are called Assertions.
There are lots of assertions in JMeter -
1. Response Assertion- The response assertion lets you add pattern strings to be compared against various fields of the server response. We can check response code 200 then it should pass .
2. Duration Assertion- The Duration Assertion tests that each server response was received within a given amount of time. you see duration in milliseconds . Just compare with response.
3.Size Assertion- The Size Assertion tests that each server response contains the expected number of byte in it. You can specify that the size be equal to, greater than, less than, or not equal to a given number of bytes. Size comes in bytes.
4. HTML Assertion- We are checking the format of response .Is it html format or not? we can provide error Threshold and Warning threshold in our HTML assertion. We can log the errors in a file .It is useful if web application has third party app and they have to talk to each other , these issues can be resolved .
5. XML Assertion- IT is a check on Xml format.
6. XPath Assertion- It is useful with API . We can assert some xpath.
August 25, 2020
Test Tool types
The various types of test tools according to the test process activities are:
Tool support for static testing:
Tool support for test specification:
Test Design tools
Tools support for performance and monitoring:
August 23, 2020
SCRUM PROCESS
Agile software development refers to a group of software development methodologies based on iterative development, where requirements and solutions evolve through collaboration between self-organizing cross-functional teams.
These are the main terms are used in Agile:
EPIC- It is a larger requirement that can be broken down into small tasks.
Story-It is a small requirement called user stories
Task - It is action that we need to complete for particular story
Agile Roles-
Product owner- Getting the requirements from the customer or stakeholder . He will define the features of the product and creating epic and stories and prioritize the stories, accept and reject work products.
Scrum Master- who drives the whole agile process. how working is going on..how we can overcome the challenges .
Scrum Team- Developers and Testers . Both work together
Definition of Ready- No of rules --suppose story is ready for testing , user story is clear, testable, feasible, defined, acceptance criteria defined, Performance criteria identified
Definition of Done- It also defines certain rules code produced, code commented, peer reviewed,build without errors, unit testing written,Deployed to system test environment ,passed UAT, Relevant documentation
Product Backlog- Prepare by product owner which contains the requirements .
Product owner will prioritize the stories and all stories have been developed and delivered to customers . In release planning decide how many sprints are required
Product owner and scrum master then have a meeting . he will contain the product backlog. Before sprint is starting, we need to plan the sprint.
In sprint planning meeting developer and QA will be there and they will go through each story and give estimation point or story point estimation. estimation is given in the form of Fibonacci series(1,2,3,5,8,---).they will decide what all stories needs to be complete.
Sprint backlog- It contains the committed stories .
For example- We have 3 months of times. We divide entire cycle into multiple parts called sprints or iterations.
In sprint Planning- what is the story and what will be the tasks of each team..
Every day there is a meeting of 15 mins that is called Scrum meeting .
They will discuss about the status and any blockers if they have.
Once Sprint is completed , we have to give demo to product owner and QA team. whether product is meet to customer requirements. After completion of sprint, Sprint retrospective meeting is done . what went wrong? what went well? improvement areas.
This is complete Scrum life Cycle..

August 21, 2020
logic Controllers in Jmeter
Controllers-
Loop, Simple, Module, Include,RandomLoop Controller-
Logic Controllers let you define the order of processing request in a Thread. It lets you control "when" to send a user request to a web server. For example, you have 3 requests and you want to set up loop for each request differently so with the help of loop controller we can do this easily.
Here I have added two requests and before one request, I have added loop count with 5 and I want to run first request 5 times and second request only one time.

Simple Controller-
Simple Controller is just a container for user request. We can use Test Fragment as the alternative of Simple Controller.

Module controller-
This functionality can be stored in Simple Controller as "modules". Module Controller will choose which module needs to run.

for Example-we have used Login request which is in Simple modular inside Module Controller.

Include Controller -
Export this test fragment and can include anywhere . For example- I have saved this file Login.jmx in test fragment and disable module controller and created include controller and browse the file login.jmx and move include controller before register request. we can remove Module Controller.

Random Controller-
A Random Controller will make one of samplers contained in it run in each loop of the thread and this sampler will be randomly selected.
August 20, 2020
Timers in Jmeter
Timers in Jmeter -
A jmeter thread by default will send requests continuously without any pause. If we want to perform load , it will be overloaded .To get a pause between the requests , timers are used. The purpose of timers is to simulate real users actions in behavior.
Some of the Timers used are
Constant Timer
Gaussian Random Timer
Synchronizing Timer
Uniform Random Timer
For example-- suppose I have 3 requests and when I run I am getting response immediately but in real scenario I have to set up timer. let see how to add timer.

Constant timer-
At Thread group I have added constant timer and u can see the time has been changed to 15 sec as I have given time in constant timer that is 5000 ms. each request is running after 5 sec.
Uniform Random timer- Basically takes random time for each request. It is used when you wants to put some fixed but some random time delay between 2 requests in software load test plan. For example- I want to put minimum delay time 3 seconds and maximum delay time to 10 seconds then i can use uniform random timer in my test plan.
Random delay - we get random delay
Constant delay offset

How to add elements??
Step 1: Create a Thread Group (Right Click Test Plan – Add – Thread -Thread Group)

Step 2: Create a HTTP Request (Right Click Thread Group – Add – Sampler -HTTP Request)

Step 3: Create a Listener (Right Click Thread Group – Listener – View Results Tree)

Step 4: Create a Listener (Right Click Thread Group – Listener – Summary Report)

Step 5: Create a Listener (Right Click Thread Group – Listener – Generate Summary Report)

Step 6: Create a Listener (Right Click Thread Group – Listener – View Results in Table)

Components in Jmeter
There are different components of JMeter are called Elements that serve their own purpose.
Thread Group-
Thread Groups is a collection of Threads.
Each thread represents one user using the application under test.
Basically, each Thread simulates one real user request to the server.
Listeners-
Listeners: shows the results of the test execution.
They can show results in a different format such as a tree, table, graph or log file.
Samplers-
Samplers are different types of request send by thread group.
We already know that Thread Groups simulate user request to the server
Configuration Elements-
set up defaults and variables for later use by samplers. For example- CSV Data config, HTTP request, FTTP Request

JMeter
What is JMeter?
The Apache JMeterTM is pure Java open source software, which was first developed by Stefano Mazzocchi of the Apache Software Foundation, designed to load test functional behavior and measure performance.
You can use JMeter to analyze and measure the performance of web application or a variety of services.

Throughput- amount of data transported to the server in respond to the client request in given period of time . IT depends on degree of parallelism.
August 18, 2020
Integration Testing
Here are some slides which are useful to understand the concept of Integration testing and difference between Big bang (non incremental)and top-down and bottom up approach(incremental).
compose =sent box
Verification vs Vadidation vs Testing
Verification-
The objective is to make sure product is as per requirements and design specifications.
It is the static testing
Are we building the product right?
It does not include the execution of code
Validation-
The objective is to making sure that products meet user's requirements.
Are we building the right product?
It includes execution of code
It is type of dynamic testing
Testing-
The process of exercising software to verify that it satisfy specified requirements and to detect faults.
crs- srs= hld-lld=coding- white box testing (devpr)= fnal=integration-sys- accepatance
August 15, 2020
Review Types
Review types --
Informal Review -Generating new ideas or solutions, quickly solving minor problems
Walk through- Exchanging ideas about techniques or style variations, training of participants
Technical Review - Evaluate quality and building confidence in the work product and generating new ideas and considering alternative implementations
Inspection- Motivate authors to improve work products and achieving consensus
Here is the list of tasks which is performed in each type of review-
Roles and Responsibilities in formal Review
Author-
Who creates the work product and fix the defects
Management-
Review planning, defining scope, selecting people, checking entry and exit criteria, Budget and time, ongoing cost effectiveness , execute control decisions
Facilitator-
Effective running of the meeting, make sure no conflict occur. Success depends on Facilitator.
Review Leader-
Decide who will be involved in the meeting and when and where it will take place.
Reviewer-
Person working on project or any stakeholder
Scribe-
Collects potential defects
Common types of Test Strategies
1.Analytical-
This type of test strategy is based on an analysis of some factor (For example-requirement or risk). Risk-based testing is an example of an analytical approach, where tests are designed and prioritized based on the level of risk.
2.Model-Based-
In this type of test strategy, tests are designed based on some model of some required aspect of the product, such as a function, a business process, an internal structure, or a non-functional characteristic (for example- reliability).
3.Methodical-
This type of test strategy relies on making systematic use of some predefined set of tests or test conditions, such as a taxonomy of common or likely types of failures.
4.Process-compliant -
This type of test strategy involves analyzing, designing, and implementing tests based on external rules and standards, such as those specified by industry-specific standards
5.Directed -
This type of test strategy is driven primarily by the advice, guidance, or instructions of stakeholders, business domain experts, or technology experts, who may be outside the test team or outside the organization itself.
6.Regression-averse-
This type of test strategy is motivated by a desire to avoid regression of existing capabilities. This test strategy includes reuse of existing testware, extensive automation of regression tests, and standard test suites.
7.Reactive-
In this type of test strategy, testing is reactive to the component or system being tested, and the events occurring during test execution, rather than being pre-planned (as the preceding strategies are).
Experienced Based Test Techniques
1.Error Guessing-
Error guessing is a technique used to anticipate the occurrence of errors, defects, and failures, based on the tester’s knowledge, including:
- How the application has worked in the past
- What kind of errors tend to be made
- Failures that have occurred in other applications
3. Checklist based Testing-
In checklist-based testing, testers design, implement, and execute tests to cover test conditions found in a checklist.
Review Techniques
There are a number of review techniques that can be applied during the individual review (i.e., individual preparation) activity to uncover defects.
1. Ad Hoc-
In an ad hoc review, reviewers are provided with little or no guidance on how this task should be performed. Reviewers often read the work product sequentially, identifying and documenting issues as they encounter them.
2.Checklist-based-
An experience based test techniques whereby the experienced tester uses a list of items to be noted, checked, or remembered, or set of rules or criteria against which a product must be verified. The main advantage of the checklist-based technique is a systematic coverage of typical defect types.
3. Scenarios and dry runs-
In a scenario-based review, reviewers are provided with structured guidelines on how to read through the work product. These scenarios provide reviewers with better guidelines on how to identify specific defect types than simple checklist entries.
4. Perspective-based -
In perspective-based reading, similar to a role-based review, reviewers take on different stakeholder viewpoints in individual reviewing. Typical stakeholder viewpoints include end user, marketing, designer, tester, or operations.
5. Role based -
Role-based review is a technique in which the reviewers evaluate the work product from the perspective of individual stakeholder roles. Typical roles include specific end user types (experienced, inexperienced, senior, child, etc.), and specific roles in the organization (user administrator, system administrator, performance tester, etc.). The same principles apply as in perspective-based reading because the roles are similar.
August 14, 2020
Alpha Vs Beta Testing
What Is Alpha Testing?
This is a form of internal acceptance testing performed mainly by the in-house software QA and testing teams. Alpha testing is the last testing done by the test teams at the development site after the acceptance testing and before releasing the software for the beta test.
What Is Beta Testing?
This is a testing stage followed by the internal full alpha test cycle. This is the final testing phase where the companies release the software to a few external user groups outside the company test teams or employees. This initial software version is known as the beta version. Most companies gather user feedback in this release.
For Example, Recently Microsoft corporation released Windows 10 beta and based on the feedback from thousands of users they managed to release a stable OS version.
Quality Assurance Vs Quality Control
Difference between Product risk and Project risk
Product risk involves the possibility that a work product (e.g., a specification, component, system, or test) may fail to satisfy the legitimate needs of its users and/or stakeholders.
When the product risks are associated with specific quality characteristics of a product (e.g., functional suitability, reliability, performance efficiency, usability, security, compatibility, maintainability, and portability), product risks are also called quality risks.
Project risk involves situations that, should they occur, may have a negative effect on a project's ability to achieve its objectives.
Here are some examples-
A. Incorrect totals on reports = product risk
B. Change to acceptance criteria during acceptance testing = project risk
C. Users find the soft keyboard too hard to use with your app = product risk
D. System responds too slowly to user input during search string entry = product risk
E. Testers not allowed to report test results in daily stand up meetings- Project risk
F. If the expected security features are not supported by the system architecture, then the system could be seriously flawed - Product risk
G. . If the developers run over budget, or run out of time, that is a problem with the running of the project – Project risk
Static Vs Dynamic Testing
Static Testing-
Static testing relies on the manual examination of work products (i.e., reviews) or tool-driven evaluation of the code or other work products (i.e., static analysis). Both types of static testing assess the code or other work product being tested without actually executing the code or work product being tested. It is basially testing of Software development architect without execution of these architect.
Static analysis can even be applied with tools that evaluate work products written in natural language such as requirements (e.g., checking for spelling, grammar, and readability).
Dynamic Testing-
Dynamic testing executes the software and validates the output with the expected outcome. Dynamic testing is performed at all levels of testing and it can be either black or white box testing.
Difference between Static and dynamic Testing-
- Static testing finds defects in work products directly rather than identifying failures caused by defects when the software is run. A defect can reside in a work product for a very long time without causing a failure. The path where the defect lies may be rarely exercised or hard to reach, so it will not be easy to construct and execute a dynamic test that encounters it. Static testing may be able to find the defect with much less effort.
- Static testing can be used to improve the consistency and internal quality of work products, while dynamic testing typically focuses on externally visible behaviors.
- Using static testing techniques to find defects and then fixing those defects promptly is almost always much cheaper for the organization than using dynamic.
Test Types
A test type is a group of test activities aimed at testing specific characteristics of a software system, or a part of a system, based on specific test objectives.
Such objectives may include:
- Evaluating functional quality characteristics, such as completeness, correctness, and appropriateness. Functional testing considers the behavior of the software, so black-box techniques may be used to derive test conditions and test cases for the functionality of the component or system
Levels of Testing
- Specific objectives
- Test basis, referenced to derive test cases
- Test object (i.e., what is being tested)
- Typical defects and failures
- Specific approaches and responsibilities
1. Component Testing-
Component testing (also known as unit or module testing) focuses on components that are separately testable.
Objectives of component testing include:
- Reducing risk
- Verifying whether the functional and non-functional behaviors of the component are as designed and specified
- Building confidence in the component’s quality
- Finding defects in the component
- Preventing defects from escaping to higher test levels.
Component testing is often done in isolation from the rest of the system, depending on the software development life cycle model and the system, which may require mock objects, service virtualization, harnesses, stubs, and drivers. Component testing may cover functionality (e.g., correctness of calculations), non-functional characteristics (e.g., searching for memory leaks), and structural properties (e.g., decision testing).
August 13, 2020
Error, Fault and Failure
Error-
A person can make an error (mistake), which can lead to the introduction of a defect (fault or bug) in the software code or in some other related work product.
Fault-
An error that leads to the introduction of a defect in one work product can trigger an error that leads to the introduction of a defect in a related work product.
For example, a requirements elicitation error can lead to a requirements defect, which then results in a programming error that leads to a defect in the code.
Failure:
If a defect in the code is executed, this may cause a failure, but not necessarily in all circumstances.
For example, some defects require very specific inputs or preconditions to trigger a failure, which may occur rarely or never.
In addition to failures caused due to defects in the code, failures can also be caused by environmental conditions.
For example, radiation, electromagnetic fields, and pollution can cause defects in firmware or influence the execution of software by changing hardware conditions
August 11, 2020
How to extract JSON response and chain in next API request
There are two ways to get extract JSON response from one API response and chain it to another API request-
1:Using Property Transfer step- Step 1 : Add the api requests in a test case
for example- I have added two requests from Reqres.in API
1. listUsers
2. Updateuser
I am getting value from response listusers endpoint and that becomes request for updateuser endpoint
Step 2 : Add a property transfer step Step 3 : Create a new property transfer
Provide source and target details
As in the source you can see i have provided $data[2].first_name (we can get it from json path finder by giving specific node)
As in the target I have given $.name
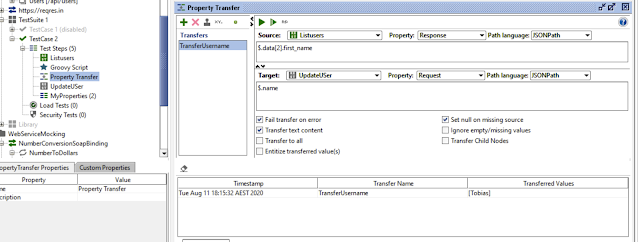 Step 4 : Provide json path in source and target References http://jsonpathfinder.com/
Chrome extension : Json path finder
Step 5 : Run and check the results
Here is the output of UpdateUser endpoint-

2. Using Groovy script-
These are the steps you can add to groovy script-
JsonSlurper https://groovy-lang.org/json.html def resp = testRunner.testCase.getTestStepByName('ListUsers').getPropertyValue('response') def jsonSlurper = new groovy.json.JsonSlurper() def object = jsonSlurper.parseText(resp) def value = object.data[5].first_name testRunner.testCase.getTestStepByName('MyProperties').setPropertyValue('user',value)
As you can see in this image-

After adding these steps, you will be able to see in the properties the value from this listuser response will be given to user variable.
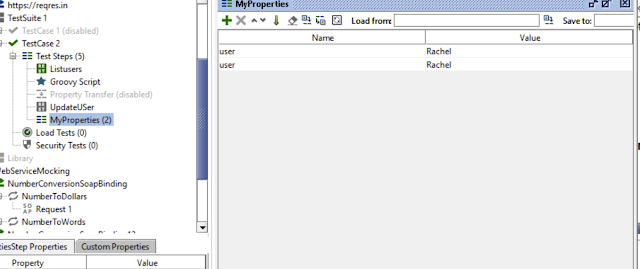
Now we need to set that property in updateuser request like-
${Properties#user} instead of name value as are getting from listuser response.
when we run our test, it is passed successful.

Thanks.
How to Validate response using Groovy Script and Xquery Parameter
Validate Response in SoapUI-
1. Xquery Parameter
2. Groovy Script
This is the web Service which I have used for validating the response. http://webservices.oorsprong.org/websamples.countryinfo/CountryInfoService.wso?WSDL
1. Xquery Parameter -
While Running this request "ListContinentsByName", I got multiple values with attribute Code and Name in response.
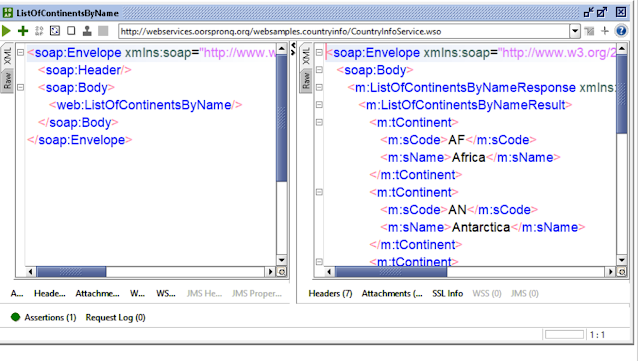
For X Query we need to run request first.
Click on Assertion Tab.
Click on + Sign to add Assertion then it will open window.
Property Content -> XQuery Match ->ADD
It will give you a XQuery Window to perform operation
Click on Declare button
It will be shown like this-
declare namespace
soap='http://schemas.xmlsoap.org/soap/envelope/';
declare namespace
m='http://www.oorsprong.org/websamples.countryinfo';
Follow the Code - see below for explanation of code-
<Result>
{
for $x in //m:tContinent
return
<List>
<Code> { $x/*:sCode/text()} </Code>
<Name> {$x/*:sName/text()} </Name>
</List>
}
</Result>
Click on Select from current from Expected result field.
The Output looks like this when you hit the "Select from current" button in Expected result field.
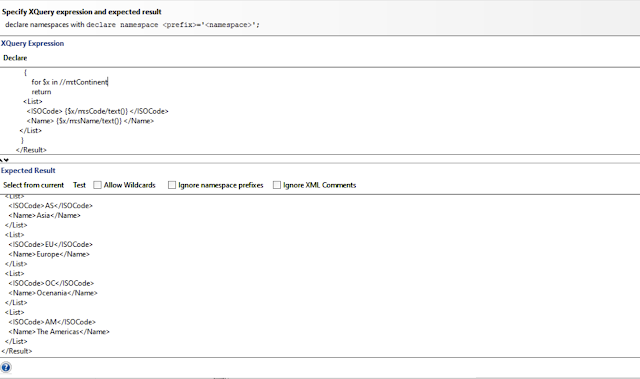
Let's Understand the line of syntax I used to get response with single node with different values.
As with XPath assertions, you'll need to make some namespace declarations; click the Declare button at the top of the editor to let soapUI do this for you.
As SOAP response in XML so we need to follow expression in XML.
With opening bracket tag with respective name followed by For clause - for $x in //m:tContinent
The for clause here, translates to "for each member in the set of element returned by //m:tContinent".
The return clause does the heavy lifting data associated with each element via XPath expression. In our example, $x/*:sCode/text() - return the value of Code element.
* plays node root we can say "m" as well if you see my response Looks like
<m:sCode>CK</m:sCode>
<m:sName>Cook Islands</m:sName>
The text() function simply indicates that you want the the actual inner value (Value between tags).
In Simple words,
//It declares iteration and XPath is where similer nodes are present
for $x in //ns:<XPath>
//It will return all values of the attribute
return {$x/ns:<Attribute>}
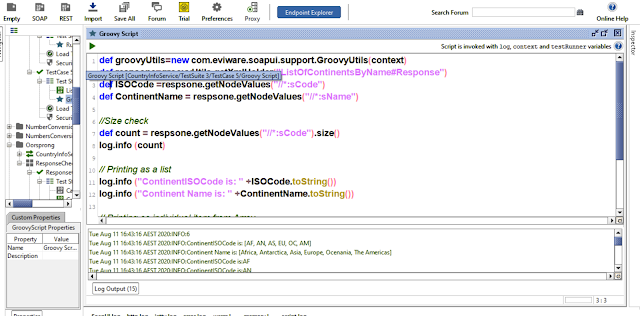
2) Groovy Script-
Groovy script code written in java script with give more flexibility in code coverage and modify application according to our perfection.
Go to request -> Right click -> Insert Steps -> Groovy Script -> open Groovy Script
def groovyUtils=new com.eviware.soapui.support.GroovyUtils(context)
def respsone=groovyUtils.getXmlHolder("ListOfContinentsByName#Response")
// Provide node value using get method
def Code = respsone.getNodeValues("//*:sCode")
def ContinentName = respsone.getNodeValues("//*:sName")
// Printing as a list ISOCode
log.info ISOCode.toString()
//Printing as a list of Name
log.info ContinentName.toString()
// Printing as individual item from Array
for(def var in Code)
log.info var
for(def var in ContinentName)
log.info var
The Output look like below,
August 10, 2020
Soap UI
Soap UI
Soap UI is a tool
for testing Web Services . It is cross platform tool and build entirely on java
platform.
WSDL is Xml
document that contains all details about Web Service and all API requests. This
is hierarchy we use in Soap UI-- Projects->TestSuite->test case->test
step
Once we download
the soap UI, we can create new Soap project. Then one Diglog box will open and
you have to write the project name and initial WSDL. As I have used CountryInfo
Service as a WebService. For example- Countryinfoservicesoapbinding
is the WSDL(Web Services Description Language). We test our API’s like
CountryName, CountryCity, CountryISOCode, FullContryInfo and so on. We have
request editor and response editor.
After right click
on WSDl, go to the option generate Test Suite, you will get a window like style
(one test case for each operation, single test case with one request for each
operation). You have to choose the style what you want but the best style is
single test case with all requests. Give test suite name then it has created a
test suite. Test case and test step will be generated .
You can validate
your test by putting many assertions as you can. We can run our test case in
sequence and parallel . When you are running test suite if a test case is
failed then test suite will be fail.
We can create our
API documentation . We can take
particular API And it is very handy .
We can create
rest API projects as well in Our SoapUI. In Rest API project, the method to
add API’ S are the same , we add different Requests and add these requests to
the test case by right click on request.
We can add
parameters (name,value,style,level) by using request editor. We can run from
different levels. In test suite, it run all the test case together. For
example, we have to check country name is present or not, for this purpose we
add assertions like contains . After adding assertions, it has become a test
case.
Properties -
Properties can be
used to store values as a variables that can be referred as testing . Properties
can be accessed at following levels:
Properties can be accessed at following
levels:
Project - ${#Project#PropertyName}
TestSuite - ${#TestSuite#PropertyName}
TestCase - ${#TestCase#PropertyName}
TestStep -
${TestCaseName#PropertyName}
System - ${#System#PropertyName}
Env - ${#Env#PropertyName}
Global - ${#Global#PropertyName}
GROOVY Script:
Groovy is
a scripting language which internally includes all the Java
libraries, therefore all java related keywords and functions can be used in
the groovy script directly.
Groovy
Script test step is included for custom automation test script creation
in SoapUI / Pro. It can be used for functional/
load/regression.
In SoapUI, we use
grovvy gettting and setting property .
It is static and
dynamic language with feature similar to python
Some of
the advantages that you will have with groovy:
·
Run
any step 5–10 times with programming
·
Read
excel files with programming
·
SoapUI
free version does not have many features but those can be used with the help of
groovy like data driven testing
·
You
can write a logic and produce an output and use it as input to a request
·
Assertion
can be applied in programming way (if / else)
·
Save
logs in your system with groovy logic
August 07, 2020
Create Own API Server
Create Own API Server -
Steps :
1) Check system has Node Js/ npm
Open Command Prompt and Check Node / Npm Installed or not!
If System has no Node/npm
Download Nodejs from - https://nodejs.org/en/download/
In Command prompt, Repeat Step 1 to check if node installed properly.
2) Install Json server
Use this command to install JSON Server
npm install -g json-server
Start JSON Server
json-server --watch db.json
3)You will see This Successful message
\{^_^}/ hi!
Loading db.json
Oops, db.json doesn't seem to exist
Creating db.json with some default data
Done
Resources
http://localhost:3000/posts
http://localhost:3000/comments
http://localhost:3000/profile
Home
http://localhost:3000
4) It will create a server with localhost/portnumber
5) Go to file explorer where db.json file -> open with Notepad/Any
6) Start create API
7) Changes make in db.json file it will reflect on Browser and Command prompt
8) In Postman, we can use same API and perform CRUD operation.
Key concepts in Pipeline
1. Agent- To build your code or deploy your software using azure pipelines, you need at least one agent. Two types of agent- Microsoft host...
-
Author- Who creates the work product and fix the defects Management- Review planning, defining scope, selecting people, checking entry an...
-
Soap UI Soap UI is a tool for testing Web Services . It is cr...
-
Create Own API Server - Steps : 1) Check system has Node Js/ npm Open Command Prompt and Check Node / Npm Installed or not! If System h...


